Shopping Cart
There are no more items in your cart
- ELECTRICAL NEWS
- 0 likes
- 477 views
- 0 comments
Installing a Staircase Light Timer: A Complete Guide
In this article, we focus on how to effectively install a timer to control stair lighting, an ideal solution for environments that require light only for the time people stay there. This device is particularly useful in spaces such as garages, basements or stairwells, where lighting is necessary for limited periods.
Why Install a Light Timer?
The light timer offers the possibility of having automatic control over the lighting, setting a timer that turns off the lights after a pre-established period of time. This solution is perfect for avoiding energy waste and, consequently, for obtaining significant savings on your electricity bill. Think about spaces such as the garage, the basement or the stairwell, where the light is often left on unnecessarily for long periods.
Steps for Installing a Light Timer
The process of installing a light timer involves some basic steps that ensure the device works properly. Below is a general overview of the steps to take:
- Choose the timer that best suits your needs, taking into account the type of lighting and the maximum load supported.
- Turn off the power supply to the installation area to ensure safety during work.
- Follow the manufacturer's specific instructions to connect the timer to the electrical circuit of the lights.
- Restore the power supply and set the timer according to your lighting needs.
By adopting a timer for your stair lights, you not only improve the energy efficiency of your space, but you also contribute to a more sustainable environment, avoiding unnecessary consumption and saving on your bill.
How the timer works
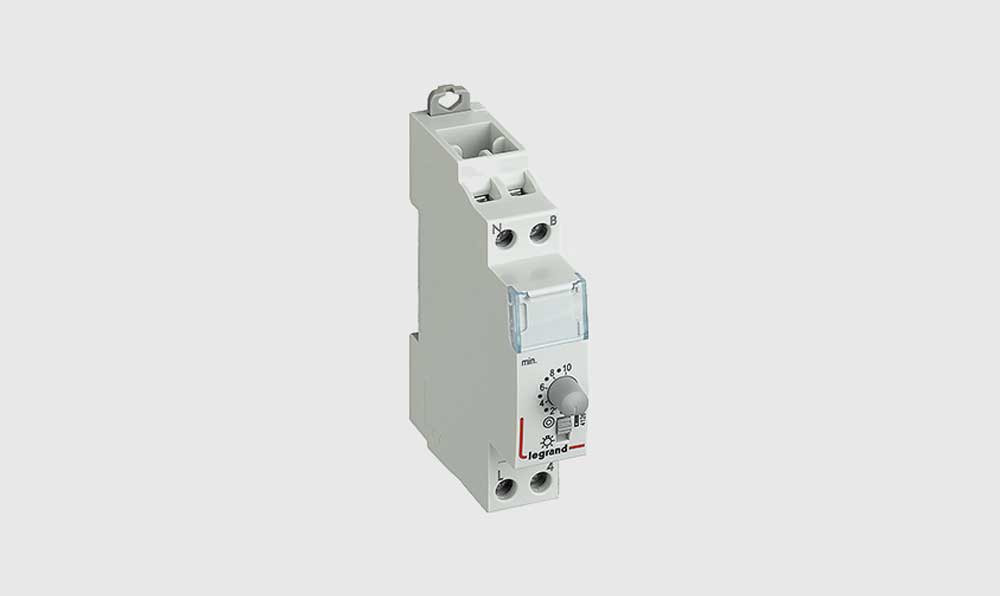
As can be seen from the following two photos, on the back of the timer we find a selector and a trimmer. The selector offers two operating modes: it can be set to “On”, thus eliminating the timer function (the light will therefore always remain on), or to “Prg” to activate the timer. The red trimmer has an equally crucial function: it allows you to set the duration for which the lights are turned on.
Adjusting the timer modes
- On mode: By selecting this option, the timer is deactivated. The consequence is that the light will remain on continuously, without turning off automatically.
- Prg Mode: This option activates the timer function of the device. Once chosen, it is necessary to adjust the red trimmer to define the period during which the lights are turned on.
Setting the duration with the red trimmer
The red trimmer is essential for personalizing the experience of using the timer. Thanks to it, the user has the possibility to vary the switching on time of the lights from a minimum of 30 seconds to a maximum of 20 minutes. This feature makes the timer extraordinarily versatile, suitable for different needs and situations.
How the timer works
As can be seen from the following two photos, on the back of the timer we find a selector and a trimmer. The selector offers two operating modes: it can be set to “On”, thus eliminating the timer function (the light will therefore always remain on), or to “Prg” to activate the timer. The red trimmer has an equally crucial function: it allows you to set the duration for which the lights are turned on.
Adjusting the timer modes
- On mode: By selecting this option, the timer is deactivated. The consequence is that the light will remain on continuously, without turning off automatically.
- Prg Mode: This option activates the timer function of the device. Once chosen, it is necessary to adjust the red trimmer to define the period during which the lights are turned on.
Setting the duration with the red trimmer
The red trimmer is essential for personalizing the experience of using the timer. Thanks to it, the user has the possibility to vary the switching on time of the lights from a minimum of 30 seconds to a maximum of 20 minutes. This feature makes the timer extraordinarily versatile, suitable for different needs and situations.
Comments (0)